There are several good links on this page. I'll just give you a couple I think are very useful. The next link describes different barcode types:
https://www.barcodefaq.com/barcoding-for-beginners/#Choosing_bar_code_type
If you know that you want to print UPC barcode labels on the ML-5000, you can skip right to the next link which gives a lot of information on the UPC barcodes:
https://www.barcodefaq.com/1d/upc-ean/
It's a lot of reading but well worth the time if you need to print barcodes.
The barcode image in this blog post is actually the UPC-A barcode for the ML-5000 label that was created on
https://www.free-barcode-generator.net/upc-a/
]]>
The easiest way to get to the printer properties is when you're in the label template document in Microsoft Word. Simply go to print the document by either presssing the Ctrl-p key combination or click on the File menu and select Print. Under the printer that you're using, click on "Printer Properties".
You'll get the Printer Properties for your particular printer that is similar to the Brother printer below. Click on the drop down menu for "Media Type" and choose "Label"
The printing speed will not be as fast as before, but the toner will have a much better chance to adhere to the label paper.
]]>The second reason, which is less common, is that there is debris, such as a label that has come off the sheet, and has stuck to any one of the rollers or on the fuser assembly. There could even be a whole sheet of paper stuck in the fuser which might be tough to see. You’ll have to open up the printer from all possible angles to check that. Check the places in laser printers like the top access door where you can take out the toner or a back door that is for thru printing (so that the rollers don’t bend the paper or labels).
Other reasons for jamming could be worn rollers, worn fuser, or gremlins
]]>All you need is a ruler, and your labels. You just need to know where to click.
Follow the clicks in the picture.
Click 1 is a click on the Mailing tab
Click 2 is a click on Labels, and this opens the Envelopes and Labels dialog box.
Click 3 is a click on the picture of the label, and this opens the Label Options dialog box
Click 4 is a click on the New Label Button, and this opens up the Label Details dialog box, and this is where you’ll put in all of the details of the label.
Now you can get measuring and create your own label template.
]]>]]>
If you’re having trouble creating a template, no need to fret, we’ve created a template specifically for the M-5352.
Click on the picture below to download the template:
]]>The Assorted File folder pack of ML-FF30 has the colors Red Blue, Green and Yellow.
]]>
If you’re using Microsoft Word, and you’d like to set these up yourself, here are the values you need to set up this custom label:
Use only if you know your printer can handle these removable labels, and they won’t come off in your printer.
]]>
Click on the picture below to download the template for the MS-3232
]]>
Be aware that these labels were designed to be used by hand, and are removable. If you’re not sure that these labels can be used in your specific printer, than we do not recommend putting these labels through your printer.
]]>
If you know you can safely print these labels on your printer, then you can use the above label.
]]>The cat address labels above are on the ML-3000 address labels.
]]>
Also be aware that printers physical margins vary from printer to printer. Your particular printer may not print at the outer margins (left,right,top,bottom). This can vary from 0″ to 3/4″. So printing on these small sheets may cover only the inner rows and columns. One more thing, if you’re having problems with the text not fitting, search our blog for ‘Vertical Text’ to help you get the text to run vertically in each cell. It’s much easier to change the text to vertical rather than change the orientation of the small sheet to landscape.:).
Just one more thing, cut out sheets of the same size to do test prints rather than wasting you’re labels.
]]>
Just click OK, and then “New Document”, and you’ve got a new template:
]]>
These labels were originally designed for hand applications, and they are also removable. While customers use these templates to print, be aware that they can come off in the printer due to the fact that they are removable and there are also high heat conditions in some laser printers, and some very tight printer roller paths in some printers.
]]>
The way around this is pretty straightforward:
1. Open your CSV file in a text editing program like notepad or Notepad++ (my personal favorite), and select and copy all of the data to the clipboard. You can use Ctrl-a, then Ctrl-c.
2. Open a blank Excel document, click inside the first cell, Cell A1, and the paste entire contents of the clipboard by typing Ctrl-v.
3. The first column should be selected after pasting, if not, select the first column, and
4. Chose Delimited, and click Next, then choose Comma and ” for text qualifier then click Next
5. Choose “Text” for column data format for each column. (
Now you’ll have correct zip codes with leading zeros.
]]>If you need a template for it, look no further.
Click on the picture below for the ML-8500 template:
]]>Before printing, and wasting sheets of MS-508 labels, cut out plain paper sheets of the same size.
Beware, printers have non-printing areas. Some printers non-printing areas are bigger than others. Depending on your printer, and there are
The Text Direction was changed to Vertical because you can just fit more text. Depending on your printer, you might have to do some fiddling with the cell margins to get things to print exactly on
You can print the Garage Sale sign directly from your browser, or download Inkscape, or use your favorite SVG editor to edit it to make it your own.
]]>If you look at the pic below, right above the first cell, you’ll see the left and right indent markers.
To Change this, just select all of the cells by clicking
To make things neater, because it’s a 1/2″ circle label, you’ll want to center the text Horizontally and Vertically as we did below by first right clicking, and then clicking on
No when you click on the table properties, click on the cell tab, and choose the vertical centering icon. Centering horizontally is easy, just click on the center text icon in the Paragraph section of the Home tab in the “Ribbon” (the Ribbon is just the name for all of the tabs such as Home, Insert, Design, Page Layout
You used to be able to copy directly from your Inkscape drawing, and paste right into your Microsoft Word document way back in Word 2007. Now in Word 2010 if you select and copy from your Inkscape drawing and paste it into your Word document, Word converts it into a low quality graphics format so now you need to perform an extra step. You must first save your SVG drawing as an EMF drawing. Then in Microsoft Word, click on the INSERT tab, and choose Pictures. Find your artwork, and when you insert it, it’ll be nice and crisp and clear, even when you zoom in.
Here is our flourish:
It’s not too difficult to make. You can start with a little spiral made with the spiral tool Shown in #1. Convert the spiral from a spiral object to a path by clicking on
Next use the Pencil tool to draw the shape in #2 but make sure that the smoothness is set to about 50, then clean it up by using the node tool on the left.
In step 3
Next, use the
Using the pencil tool, create a straight line to connect both #5’s and use the node tool again to connect the ends of the line, and you get #7
In #8 I just dragged down the center of the line with the node tool.
Now you can squish it, expand it, squash it, blow it up, and make it look however you want.
And now put it in your shipping label by exporting to
These labels can be used for applications where there are poor weather conditions or moist environments. The ML-3050W weather resistant address labels are made of water-resistant material. They are Tear-proof, and have permanent adhesive. For use in both laser and ink jet printers.
]]>Don’t just cut and paste them into an empty ML-0600 Shipping Labels template. What you have to do is first
Microsoft Word shipping label template, which is also compatible with the Avery 5164 Template.
]]>
The first step is to create the Excel file with consecutive numbers. Lets say for instance you want to number your labels from 1 to 2000. We’ll also want to pad the numbers on the left with zeros. It just looks neater that way. First name the column A by typing the word NUMBER into cell A1. Select the entire first column by clicking on the
To fill in the column, hold a right click on the lower right hand corner of the cell you just typed in. As you hold it, also press the Ctrl key, and drag straight down to the bottom of the page. Holding the Ctrl key will increment the values as you drag the mouse cursor down to however far you want to go. I went to 2000, and I renamed the file to 1-2000
I’ve got to admit something here, we really didn’t need to format the NUMBER column, because if we use that as a merge field, Microsoft Word only sees what the original input was,
So now that we have our data, we just need the Primary Merge Document, shown below.
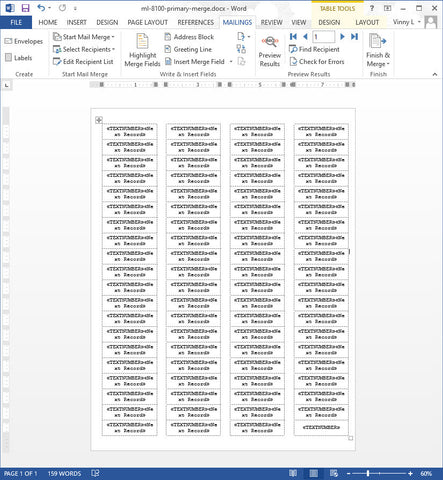
If you’re quick at copy and pasting using the keyboard and mouse combination, creating the above document should be pretty quick. Caution: in the last cell of the document in the lower right of the document, leave off the merge command «Next Record», because Word automatically advances the record to the next record at the end of the page. If you put the «Next Record» in the last cell, you’ll wind up skipping a record, and the next page will start at 82 instead of the correct 81. And the merged result is below.
]]>This layout was created in Inkscape. If you click on the picture, your browser should display the actual SVG file, and you should be able to print it out on an 8.5 X 11 sheet, or Full Sheet Label. If you’d like to edit the document, then download Inkscape for free, and start the learning process.
]]>Check them out, they’re compatible with Seiko SLP-2RL, Dymo 30251, Seiko SLP-SRL, Dymo 30323, Seiko SLP-MRL, Seiko® SLP-35L, Seiko® SLP-FLW, and Dymo 30327.
]]>